
Crows by the thousand blacken the sights of Cluj through car-thronged streets of high-rises, dropping their bombs of white on the pavement. Islands of luck.
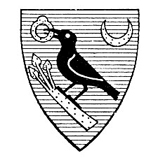
The hooded crow is the coolest of symbols for a city of gray and dust. Proud on the king's coat of arms, its brother holds the golden ring of power, stolen on a hunt. Meanwhile, Matthias Rex sits over the square and rues on what happened, a white patch on his head.

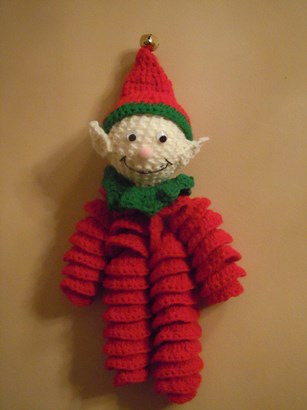
This birdy is an innocent brother of theirs, soft and spotless.
So here's the pattern:
The hooded crow is the coolest of symbols for a city of gray and dust. Proud on the king's coat of arms, its brother holds the golden ring of power, stolen on a hunt. Meanwhile, Matthias Rex sits over the square and rues on what happened, a white patch on his head.
This birdy is an innocent brother of theirs, soft and spotless.
So here's the pattern:
Skill
level: easy and moderate (because of the wings).
Size: About
10”/25 cm from top of head to tip of feet.
Hook: 2.50
mm
Gray and
black yarn
Do not join
rounds. Mark the last stitch of first round and move the marker up with each
round.
HEAD
Stuff the head as you go.
Stuff the head as you go.
With GRAY
1. 3 sc in magic ring
2. 2 sc in each sc around (6)
3. Sc around (6)
4. *Sc in each of next 2 sc, inc in next stitch* around (8)
5. Sc around (8)
6. *Sc in each of next 3 sc, inc in next stitch* around (10)
7. *Sc in each of next 4 sc, inc in next stitch* around (12)
8. *Sc in each of next 3 sc, inc in next stitch* around (15)
9. *Sc in each of next 4 sc, inc in next stitch* around (18)
10. *Sc in each of next 5 sc, inc in next stitch* around (21)
Change color to BLACK
11. *Sc in each of next 6 sc, inc in next stitch* around (24)
12. *Sc in each of next 7 sc, inc in next stitch* around (27)
13. – 14. Sc around for 2 rounds (27)
15. *Sc in each of next 7 sc, sc2tog* around (24)
16. *Sc in each of next 6 sc, sc2tog* around (21)
17. *Sc in each of next 5 sc, sc2tog* around (18)
18. *Sc in next st, sc2tog* around (12)
19. Sc2tog around (6)
Sew shut.
BODY
With GRAY
1. 6 sc in magic ring
2. Inc around (12)
3. *Sc in next stitch, inc in next stitch* around (18)
4. *Sc in each of next 2 sc, inc in next stitch* around (24)
5. – 10. Sc around (24)
11. *Sc in each of next 3 sc, inc in next stitch* around (30)
12. – 20. Sc around (30)
21. *Sc in each of next 3 sc, sc2tog* around (24)
22. *Sc in each of next 2 sc, sc2tog* around (18)
23. Sc around (18)
24. *Sc in next stitch, sc2tog* around (12)
25. Sc2tog around (6)
Finish off, leave tail for sewing on head. Stuff.
LEG x 2
With BLACK
1. 6 sc in magic ring
2. *Sc in each of next 2 sc, inc in next stitch* around (8)
3. – 21. Sc around (8)
1. 6 sc in magic ring
2. *Sc in each of next 2 sc, inc in next stitch* around (8)
3. – 21. Sc around (8)
Finish off, leave long tail for sewing. Stuff.
WING x 2
This is the only piece not done in the amigurumi style.
1. Chain 3 + 1 (4th chain as 1st chain of row 2 – all ch1’s will represent the first sc of the next row)
2. Sc in the 1st ch from hook (this is in fact an increase), 1 sc in next ch, inc in next stitch (5), ch 1, turn
3. Sc in 1st sc from hook (another inc), 1sc in next 3 sc, inc in next stitch (7), ch1, turn
4. Sc in 2nd sc from hook, 1 sc in each sc (7), ch1, turn
5. Sc in 2nd sc from hook, 1 sc in each sc (7), ch1, turn
6. Sc in 2nd sc from hook, 1 sc in each sc (7), ch1, turn
7. Sc in 2nd sc from hook, 1 sc in next sc, 2sc in next sc, 1 sc in next 3 sc (8), ch1, turn
8. Sc in 2nd sc from hook, 1 sc in each sc (8), ch1, turn
9. Sc in 2nd sc from hook, 1 sc in each sc (8), ch1, turn
10. Sc in 2nd sc from hook, 1 sc in each sc (8), ch1, turn
11. Sc in 2nd sc from hook, 1 sc in each sc (8), no ch1 at the end before turning – this is in fact a decrease
12. Sc in 2nd sc from hook, 1 sc in next 6 sc (7), ch1, turn
13. Sc in 2nd sc from hook, 1 sc in each sc (7), no ch1 before turning
14. Sc in 2nd sc from hook, 1 sc in next 5 sc (6), ch1, turn
15. Sc in 2nd sc from hook, 1 sc in each sc (6), no ch1 before turning
16. Sc in 2nd sc from hook, 1sc in next 4 sc (5), ch1, turn
17. Sc in 2nd sc from hook, 1 sc in each sc (5), ch 1, turn
18. Sc in 2nd sc from hook, 1 sc in each sc (5), ch 1, turn
19. Sc in 2nd sc from hook, 1 sc in next sc, sc2tog (4), ch1, turn
20. Sc in 2nd sc from hook, 1 sc in each sc (4), ch1, turn
21. Sc in 2nd sc from hook, sc2tog (3), ch1, turn
22. Sc in 2nd sc from hook, 1 sc in next sc (3), ch 1, turn
23. Sc2tog in 2nd and 3rd sc from hook (2), ch1, turn
24. 1 sc in 2nd sc from hook (2), no ch1 before turning
25. Slip stitch in 2nd sc from hook
Without finishing off, do a round of sc’s all around the edge of the wing – finish off with a slip stitch in the slip stitch of row 25, and leave a long tail for sewing.
SCARF
With BLACK
1. Ch 80, turn
2. Skip 1 stitch, sc 79, finish off.
Assemble parts.


